Pages

Tuesday, September 30, 2014

Easy Propagation of Sedum Perennials

sedum

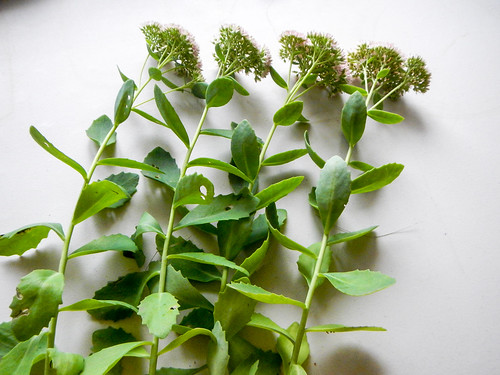
My Autumn Fire sedums bloom a gorgeous rosy-pink in late summer, and I wanted more of them. The bees love them, and so do I. The original plant was about $10. I was tempted to visit the garden store to buy more, but decided to do a little research first.

Thanks to Teresa’s blog, I learned how to propagate sedum perennials. You can read her original post here. She describes four different ways of propagation: water immersion, controlled pot growth, direct placement, and division. I am going to experiment with water immersion and controlled pot growth.

Step one for both methods is to get a couple cuttings. I picked some younger shoots on the edge that were about 12 inches tall. I cut the flowers off and saved them in a bowl of water. As my test, I am going to try four starts for each method to see which works best for me.

Propagating Sedum


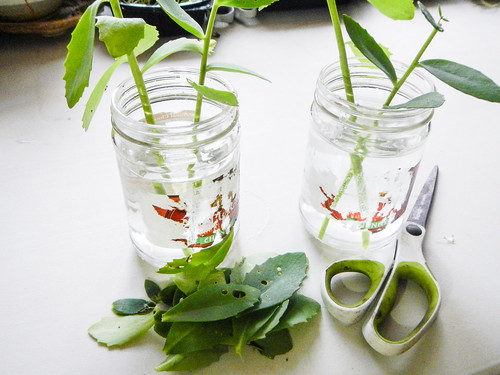
For the water immersion method:

  1. I cut the initial 12 inch stems into two six inch stems.
  2. Cut the leaves from the bottom of the stem, so no leaves would be touching the water.
  3. Put the stems in water and in a sunny window.
  4. Water until roots form.

Propagating Sedum


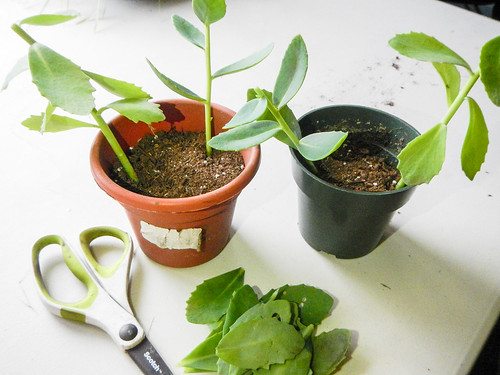
For the controlled pot growth method:

  1. I cut the initial 12 inch stems into two six inch stems.
  2. Cut the leaves from the bottom of the stems, so no leaves would be touching the dirt.
  3. Put the stems in some damp potting soil in a sunny window.
  4. Water until roots form.

Propagating Sedum


I expect both methods will root in one to three weeks. Stay tuned for future updates! 

Friday, September 26, 2014

Small Toad

2014-08-31 14.24.27

When planting earlier this month, I found several small toads jumping across the yard. I moved them out of the way so they wouldn’t get squished. I usually have a few toads in the yard, but this is the most I have seen in one day (four). It is a great sign there is enough diversity in my yard for them to thrive.

Tuesday, September 23, 2014

Planting Chokeberry Bushes

20140831_112730

Last year I planted six cherry bushes. Only two of them survived the winter, so I bought some chokeberry bushes to add some variety to the future hedge. I planted two different kinds. One of them came with 1/2 pound of berries which I am going to turn into a syrup. The berries on the Autumn Magic tasted slightly better than the glossy black.


20140831_111809

Glossy Black Chokeberry aka Aronia melaocarpa var. elata. Height: 4-6’, Spread: 4-6’, Hardy to –40F. Full Sun

Autumn Magic Chokeberry aka Aronia melanocarpa ‘Autumn Magic’. Height: 4-6’, Spread: 4-6’, Hardy to –40F. Full sun to part shade.

Friday, September 19, 2014

Planting a new Hardy Kiwi

20140831_111528
Last year, I planted two Issai Hardy Kiwis. A few months later one was trampled by some contractors my neighbor hired. I was hopeful it would recover. It didn’t. I bought a new one and planted it. It is much more vigorous than the one I planted last year, so I am hopeful it will survive and thrive.
Issai Hardy Kiki aka Actinidia arguta ‘Issai’. Height: 15-25’, Spread: varies (vine), Hardy to –30F.

Tuesday, September 16, 2014

Busy Bumblebees

collage_20140911153131857
The bumblebees are busy enjoying the autumn flowers! The top is a bright pink sedum, and the bottom two shots are of the prolific garlic chives in my yard. The bees seem to go crazy for both. The cold had them moving slowly, so I could keep up with them and get a few photos.

Friday, September 12, 2014

Planting Fruit Trees

20140901_100143

With help from a friend, I planted two more fruit trees this past week. One plum and one cherry. We gave them a large helping of mulch too. Since we had a bit of mulch left over with my two apple trees in the background got some more as well. I had fun hauling the mulch with my sidecar.

The plum is a “Mount Royal Plum” aka Prunus ‘Mount Royal’. Height 8-12’, Spread: 6-10’, Hardy to –30F.

The cherry is a “North Star Cherry” aka Prunus ‘North Star’. Height: 8-10’, Spread: 6-8’, Hardy to –30F.